 Save
Save I'll never forget the first time I saw a multi-tiered grazing board at an elegant holiday party—it was like stepping into the world of The Nutcracker Suite itself. The cascading arrangement of jewel-toned cheeses, glossy chocolates, and glittering fruits felt too beautiful to eat, until someone handed me a small plate and I realized that was exactly the point. That evening, I became obsessed with creating my own theatrical board, one that would make guests gasp the moment they walked in. This is the recipe I've perfected over countless celebrations since.
I remember assembling one of these boards for my sister's engagement party, and watching people arrive, set down their coats, and immediately gravitate toward it like it was glowing. They didn't just eat from it—they lingered, they explored, they shared little discoveries with each other about flavor combinations they'd never tried before. That's when I understood that a grazing board isn't just food; it's an experience, a conversation starter, a moment of theater right there on your dining table.
Ingredients
- Brie (150 g): This creamy white cheese forms your elegant anchor—choose a cold one so it slices cleanly, and let it come to room temperature just before serving to release its buttery richness.
- Aged cheddar (150 g): The golden-yellow block provides both visual warmth and a sharp, complex flavor that everyone recognizes and loves.
- Blue cheese (150 g): A daring, gorgeous jewel-tone that adds sophistication—crumble some portions to make it less intimidating for cheese newcomers.
- Gouda (150 g): The honey-toned performer that bridges subtle sweetness with savory depth, a workhorse cheese that disappears quickly.
- Cranberry goat cheese (100 g): This ruby-hued beauty adds a pop of tartness and color that catches everyone's eye first.
- Prosciutto (100 g): Buy it sliced thin and fold it loosely into ruffles—it drapes beautifully and tastes delicate, never heavy.
- Salami and soppressata (100 g each): Layer these in overlapping petals to create texture and those gorgeous deep-red gradations that define the board's color story.
- Red, green, and blueberries (1 cup each): These berries are your jewels—cluster them tightly in their color zones so they create visual impact and stay fresh longer.
- Strawberries, dried apricots, and pomegranate seeds (1 cup each): The pomegranate seeds especially add a jeweled, glistening quality that makes the board feel celebratory.
- Marcona almonds and pistachios (1/2 cup each): Toast them lightly if you have time—they stay crunchier and their flavor deepens beautifully.
- Candied pecans (1/2 cup): These sweet-savory morsels bridge the cheese section and the sweets section, creating flavor harmony across the board.
- Olives, crackers, and baguette (1/2 cup and 1/2 loaf): These are your building blocks—they give structure and provide something to pair with every other element on the board.
- White and dark chocolate (150 g each): Choose bars with at least 70% cacao for the dark—it balances sweetness and feels luxurious, not juvenile.
- Macarons and petit fours (12 each): These tiny confections are pure theater; their pastel colors complete your color-blocking story and provide the final flourish.
- Rosemary sprigs and edible flowers: These aren't just garnish—they anchor your board visually and whisper that you care about every detail.
Instructions
- Build Your Foundation:
- Start with a large wooden board or assemble your multi-tiered structure using cake stands, pedestals, or even overturned bowls hidden beneath platters. I learned the hard way that stability matters—nothing ruins a moment like watching a tier shift. Test everything before you add food, pressing down gently to ensure each level is rock-solid.
- Create the Base Layer:
- Begin with neutral elements: arrange your crackers in neat stacks, fan your baguette slices slightly, and place nuts in small bowls or scattered clusters. This is your stage—you're not being fancy here, just organized. Think of it as creating safe spaces for people to navigate the board without everything sliding around.
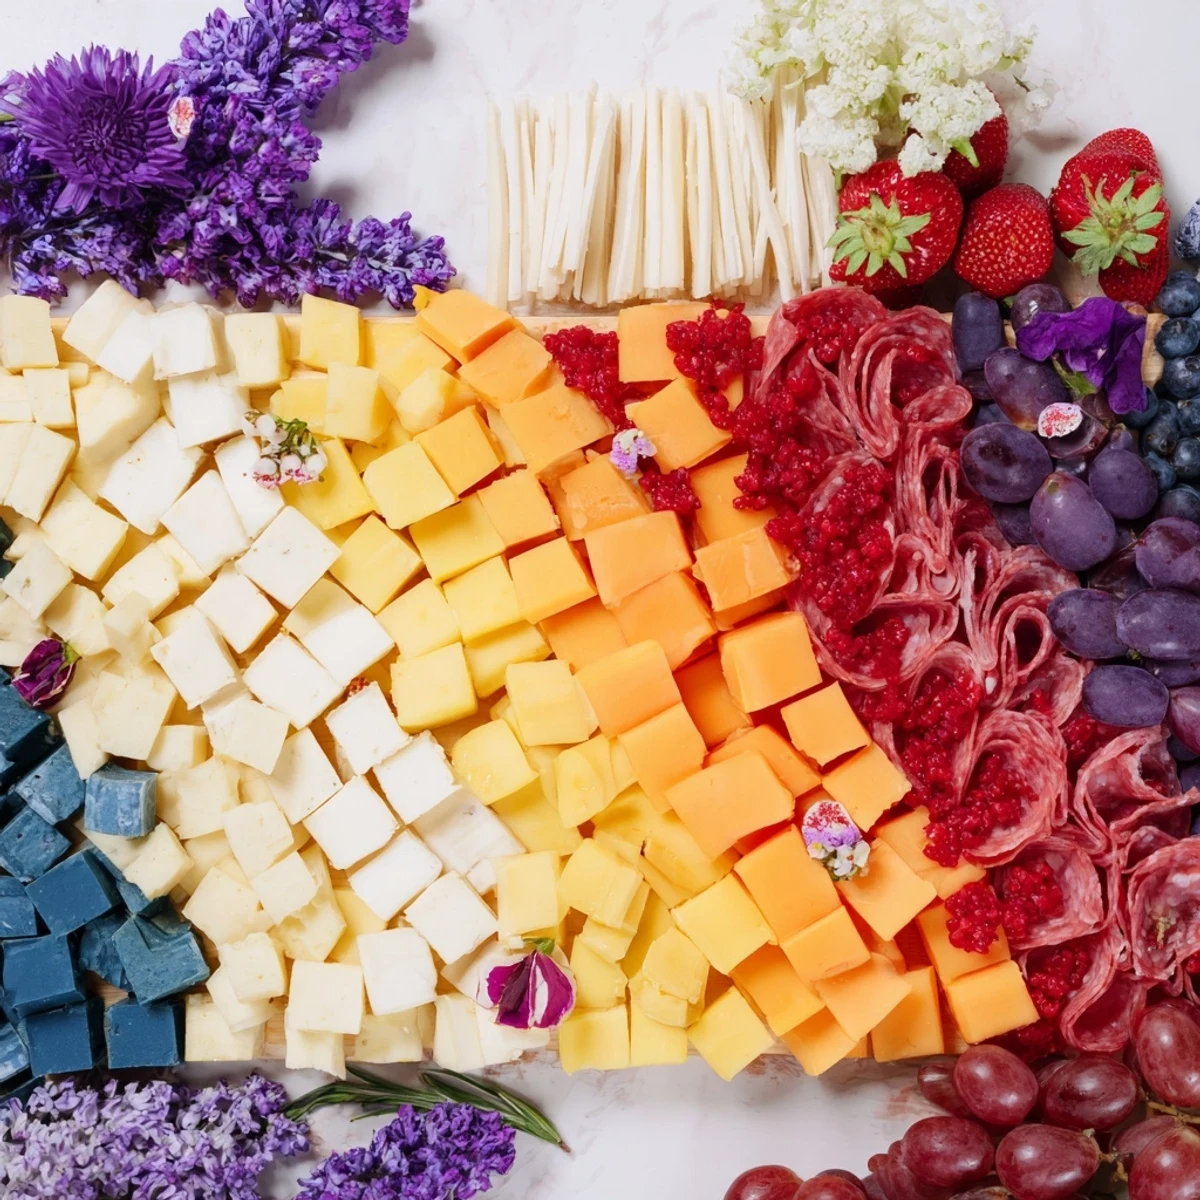
- Honor the Color Blocks:
- This is where the magic happens. Organize each tier and section by color, creating distinct zones like you're painting a masterpiece. The white tier (brie, marcona almonds, white chocolate), the gold tier (aged cheddar, dried apricots), the ruby tier (cranberry goat cheese, strawberries, pomegranate seeds)—each color family should live together, not scattered. This isn't just pretty; it's how people's eyes navigate the board.
- Arrange Cheeses with Intention:
- Cut some cheeses into wedges, leave others in chunks, and let a few pieces stand whole for height variation. Position them so their colors sing against the wood and against each other. I like to cut the blue cheese into small crumbles near the whole block so people feel invited to try it.
- Drape the Charcuterie:
- Fold prosciutto into loose, ruffled shapes—it should look effortless and romantic. Layer the salami and soppressata in overlapping petals, creating movement and texture. Let them slightly cover neighboring cheeses; that's intentional overlap, not messiness.
- Fill the Gaps with Fruits and Brightness:
- Cluster berries by color, piling them generously so they create little peaks and valleys across the board. The pomegranate seeds especially should be heaped where they catch light. Layer, don't scatter—abundance comes from clustering, not spreading thin.
- Add the Sweet Elements:
- Break your chocolate bars into irregular shards and arrange them in their color zones. Position macarons in a graceful arc or gentle line; they're small enough to feel precious. Scatter petit fours where they peek out playfully—they should feel like discoveries, not clutter.
- Garnish with Flourish:
- Tuck fresh rosemary sprigs around the board like little green accents—they add fragrance and forestlike drama. Scatter edible flowers (pansies, nasturtiums, or violas) where they fill gaps and add unexpected color pops. This final step transforms the board from impressive to breathtaking.
- Make It Accessible:
- Before guests arrive, ensure every tier is stable and nothing is too crowded to reach. Position cheese knives where they're clearly cheese knives, place small forks near charcuterie, and leave a little breathing room so people can actually serve themselves without playing Jenga with your masterpiece.
 Save
Save I think about the quiet moment during my best friend's holiday dinner when everyone had stopped talking because they were too busy admiring the board, and then tasting, and then discovering combinations they'd never imagined. That's when I realized this isn't about being fancy—it's about creating a space where people slow down, stay longer, and enjoy both the food and each other more intentionally.
The Color-Blocking Philosophy
The Nutcracker Suite board works because it treats your grazing platter like a painter would treat canvas. Rather than random assortment, you're creating distinct color zones that guide the eye and make the board feel intentional. When someone sees clear color families—all the whites together, all the golds, all the deep reds—they perceive it as curated and special. It's the same amount of food, but organized differently, and somehow it transforms into art.
Making It Your Own
The beauty of this board is that it's endlessly customizable. Match the colors to your party's theme, your kitchen's aesthetic, or even the specific characters from The Nutcracker Suite—create a Sugar Plum Fairy section with whites, pinks, and purples, or a Russian section with golds and deep crimsons. You can substitute cheeses based on what you find at your market, swap fruits seasonally, or adjust the sweet elements to match your guests' preferences. The structure stays the same; the specifics can be entirely yours.
Pairings and Timing Tips
Serve this board with sparkling wine for that celebratory fizz, a light red wine like Pinot Noir if you want something more substantial, or even a fragrant herbal tea for non-alcoholic guests. Start assembling everything an hour before guests arrive—this gives you time to catch any gaps, add finishing touches, and actually enjoy watching people's faces light up when they see it. For allergen-conscious guests, keep the chocolate and any items with shared utensils separate, and always clearly label items containing nuts or dairy if someone's concerned.
- Set out small plates and napkins near the board, not far away—people will graze more if they don't have to walk.
- Keep a cheese knife dedicated to each cheese type to prevent flavors from mingling in unwanted ways.
- If you're assembling this hours ahead, cover the board loosely with plastic wrap and refrigerate—it keeps everything fresh and prevents unwanted browning on cut surfaces.
 Save
Save This board is about more than feeding people—it's about creating a moment where food becomes an experience, where your kitchen becomes a gallery, and where everyone at your table feels celebrated just by being there. Make it, watch their faces, and enjoy being the person who dreamed this up.
Recipe FAQ
- → How can I make a vegetarian version?
Simply omit the charcuterie and add more cheeses, marinated vegetables, or roasted nuts to keep the board varied and flavorful.
- → What is the best way to arrange the items?
Organize ingredients by color in distinct blocks on multiple tiers, starting with neutral bases like crackers and nuts, then layering cheeses, meats, fruits, and sweets.
- → How do I achieve the multi-tiered effect?
Use cake stands, pedestals, or overturned bowls beneath platters to add height and create a dramatic, layered presentation.
- → What types of cheeses work well for this board?
Choose cheeses with varied colors and textures like brie, aged cheddar, blue cheese, gouda, and cranberry goat cheese to enhance visual appeal.
- → Are there suitable drink pairings?
Pair with sparkling wine, light red wine, or herbal tea to complement the diverse flavors of the board.
- → How should garnishes be used?
Fresh rosemary sprigs and edible flowers add festive touches and color contrast that elevate the overall presentation.