 Save
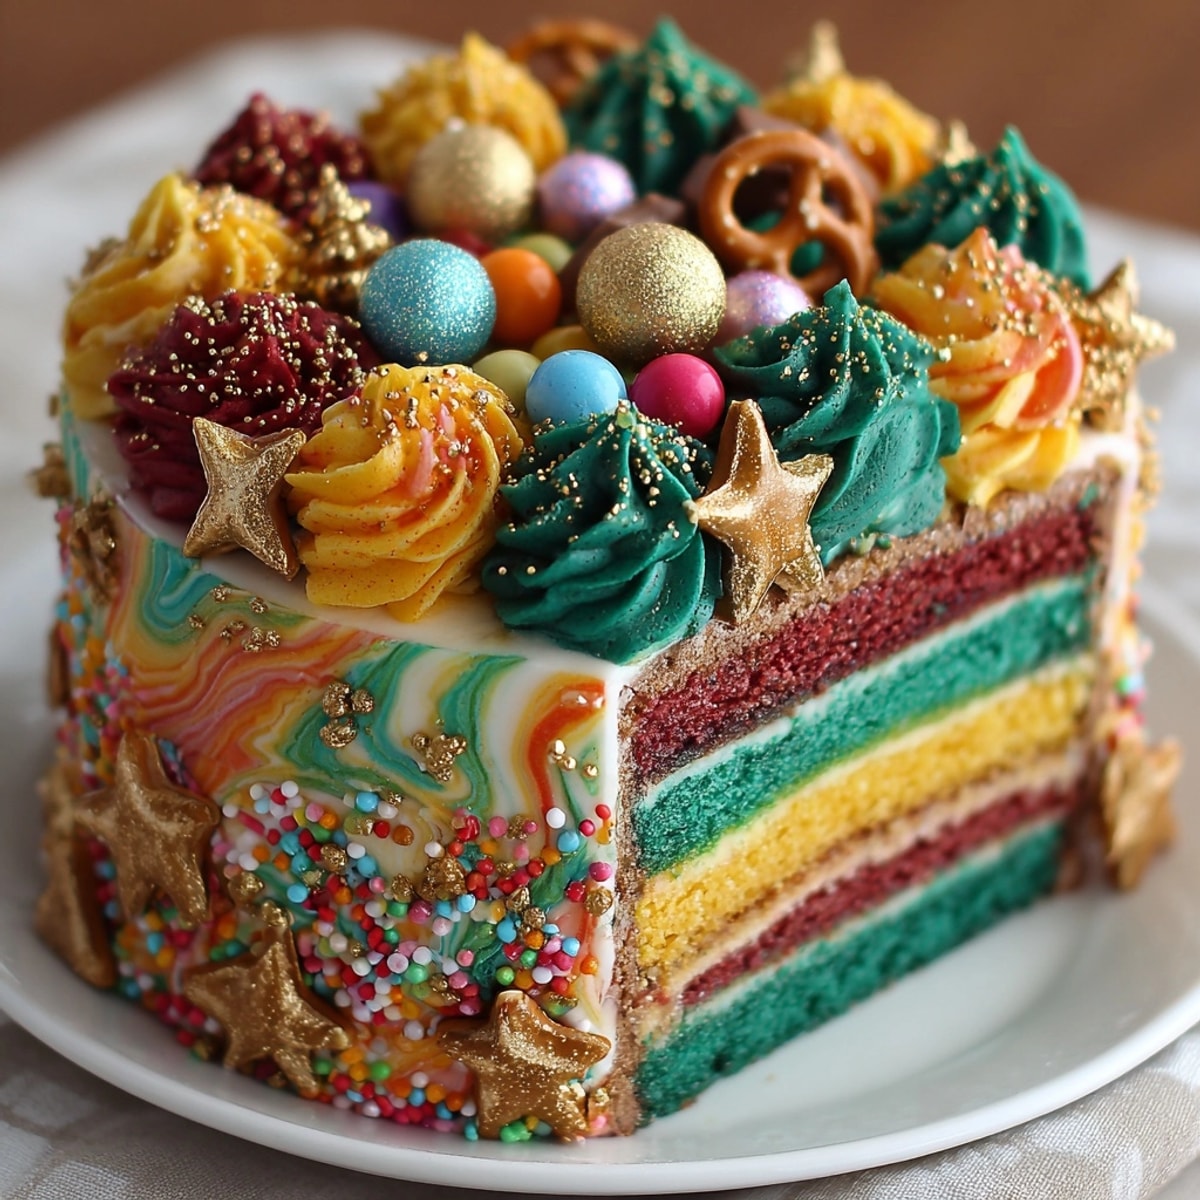
Save This festive Chaos Cake Christmas Swirls has become my signature holiday centerpiece, combining vibrant cake layers with playful buttercream designs that never fail to bring gasps of delight from guests. The deliberately askew stacking creates a whimsical Christmas tree effect that looks professionally crafted but is surprisingly achievable for home bakers of any skill level.
I first created this cake when tasked with bringing something memorable to our neighborhood holiday potluck. What began as a kitchen experiment has now become our most requested December tradition, with my children eagerly awaiting their turn to choose which colors and candies we'll feature each year.
Ingredients
- Cake Layers: All purpose flour creates the perfect structure for these colorful layers
- Baking powder: ensures proper rise without overwhelming leavening
- Salt: balances sweetness and enhances flavor complexity
- Unsalted butter: provides rich flavor and tender crumb
- Granulated sugar: sweetens while creating moisture retention
- Large eggs: bind ingredients and add structure to the cake
- Vanilla extract: adds warmth and depth to the base flavor
- Whole milk: creates richness and proper moisture content
- Gel food coloring: delivers vibrant hues without thinning batter
- Buttercream: Unsalted butter forms the creamy base for smooth frosting
- Powdered sugar: provides sweetness and proper consistency
- Whole milk: adjusts thickness for perfect piping texture
- Vanilla extract: complements the cake flavors beautifully
- Salt: balances sweetness for a more complex flavor profile
- Gel food coloring: creates vibrant decorative elements
- Decoration: Edible glitter and sprinkles add festive sparkle and texture
- Assorted candies: create dimensional visual interest
- Pretzel sticks: offer a clever natural element as the tree trunk
Instructions
- Prepare Your Workspace:
- Preheat your oven to 350°F and gather all ingredients measured and ready. Line your cake pans with parchment circles and grease the sides thoroughly. Having different sized pans creates the tiered effect but you can bake in batches if needed.
- Mix Dry Ingredients:
- Whisk the flour, baking powder, and salt together in a medium bowl until completely combined. This ensures even distribution of leavening agents throughout your batter for consistent rise.
- Cream Butter and Sugar:
- Beat the softened butter and sugar together for a full 3 to 4 minutes until truly light and fluffy. This incorporates air into the mixture which creates a tender crumb in your finished cake. The mixture should visibly change to a pale yellow color.
- Add Eggs and Vanilla:
- Add each egg individually, mixing for about 30 seconds between additions. This prevents the mixture from curdling and ensures proper emulsification. After all eggs are incorporated, add vanilla extract and mix until just combined.
- Combine Wet and Dry Ingredients:
- Starting and ending with dry ingredients, alternate adding the flour mixture and milk to the butter mixture in three additions of flour and two of milk. Mix gently just until incorporated after each addition. Overmixing develops gluten which toughens cake texture.
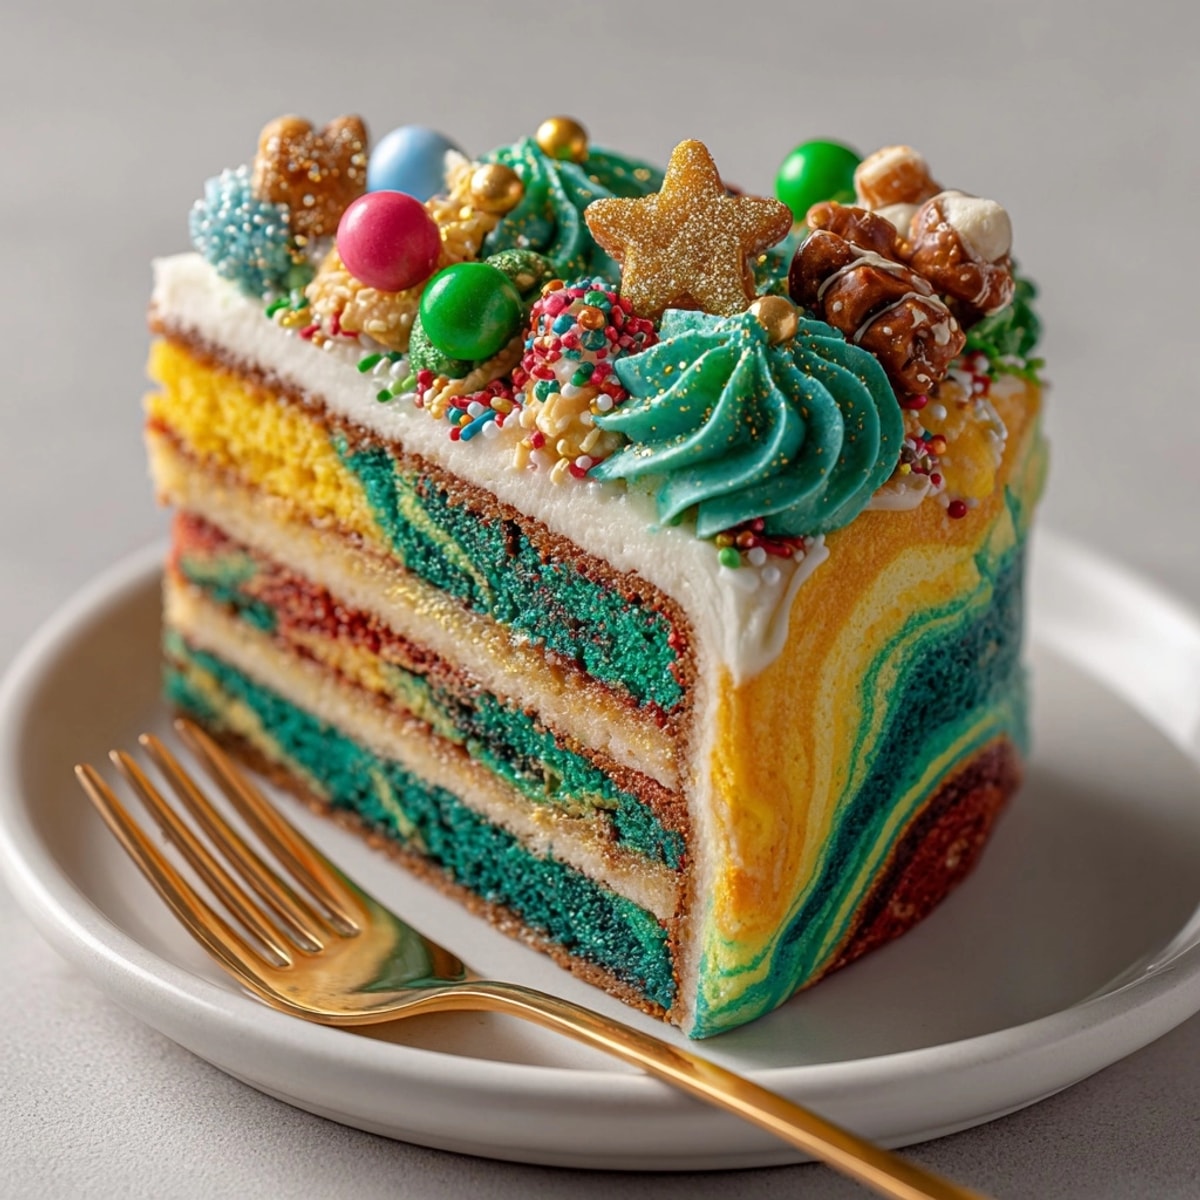
- Color and Swirl Batter:
- Divide batter equally among four bowls and add gel food coloring to create vibrant holiday hues. Pour colored batters into prepared pans, then use a skewer to create gentle swirls. Pull the skewer through no more than three times to prevent colors from becoming muddy.
- Bake to Perfection:
- Bake cakes for 25 to 30 minutes until a toothpick inserted in the center comes out clean. The edges should pull slightly away from the pan sides and the top should spring back when lightly touched. Cool in pans for exactly 10 minutes before transferring to cooling racks.
- Prepare Buttercream:
- Beat softened butter until completely smooth before gradually adding sifted powdered sugar. Add milk, vanilla, and salt, beating at high speed for 3 to 5 minutes until incredibly light and fluffy. Separate into portions and color with gel food coloring for vibrant decorating options.
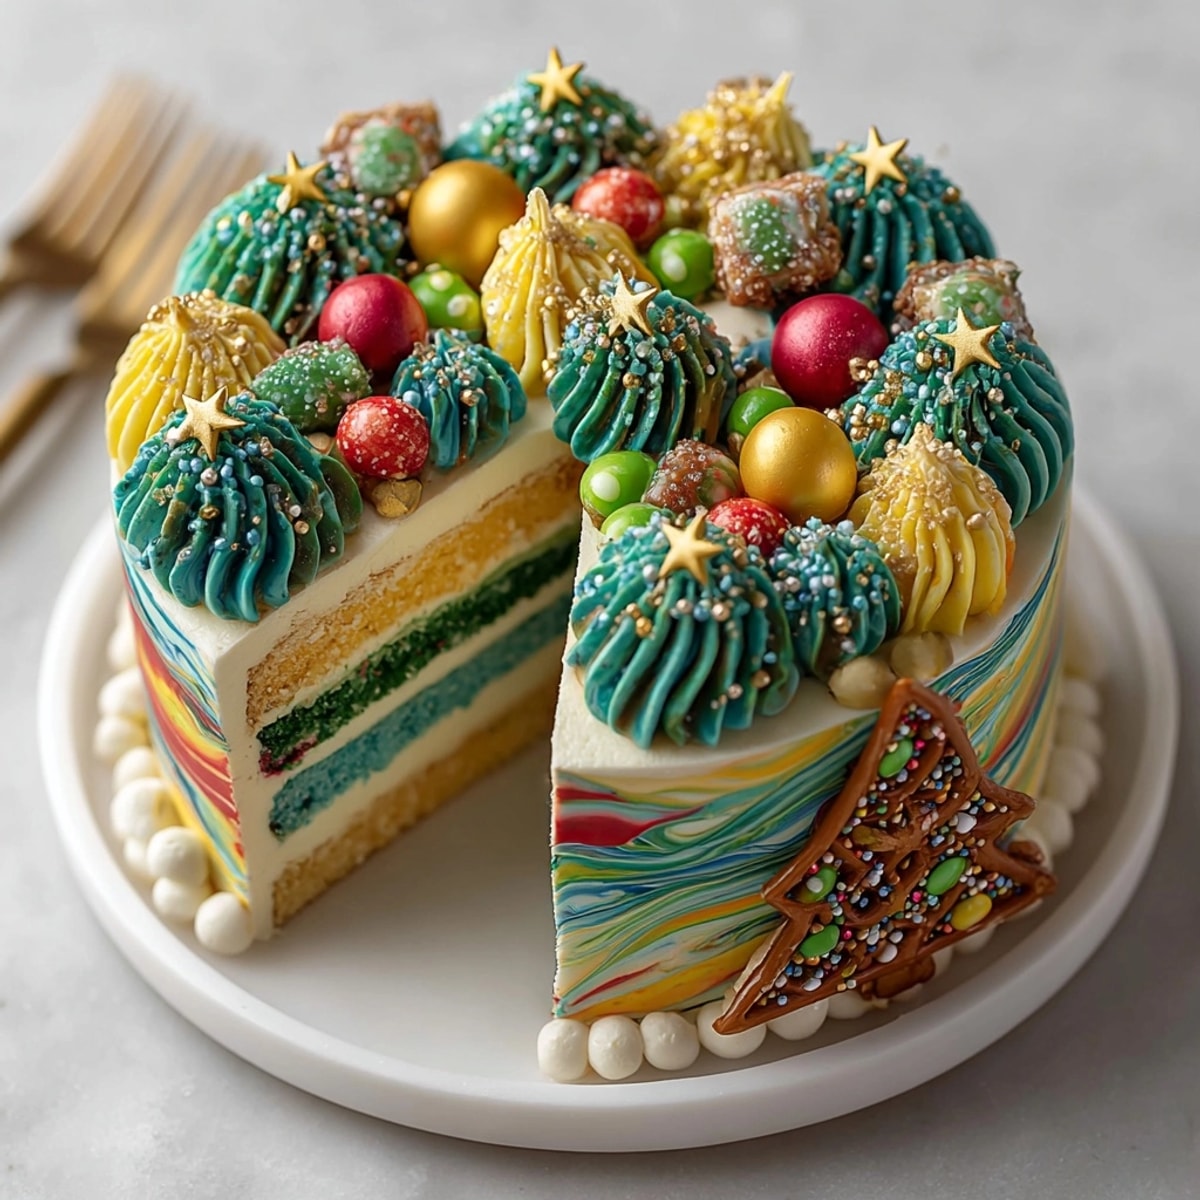
- Assemble Cake Structure:
- Level each cake layer with a serrated knife if needed. Stack from largest to smallest, offsetting each layer slightly for the whimsical crooked tree effect. Apply buttercream between layers, making sure each layer is secure but maintaining the intentionally askew positioning.
- Create Decorative Swirls:
- Using piping bags fitted with star or round tips, create decorative buttercream swirls around the entire cake. Alternate colors in sweeping motions to mimic tree branches or garland. Vary pressure on the piping bag to create dimension and movement in your design.
- Add Finishing Touches
- Carefully place edible decorations around the buttercream swirls. Position candies, sprinkles and edible glitter strategically to resemble ornaments and lights. If desired, insert a pretzel stick at an angle into the base to represent a tree trunk.
 Save
Save The gel food coloring is truly the secret weapon in this recipe. Unlike liquid food coloring which can thin your batter and buttercream, gel colors provide intense vibrancy without affecting consistency. I once tried making this with natural food colorings from beets and spinach, and while the cake tasted wonderful, the colors weren't nearly as striking for that true Christmas wow factor.
Make-Ahead Tips
The cake layers can be baked up to three days in advance and stored tightly wrapped at room temperature. You can also freeze the unfrosted layers for up to a month by wrapping in plastic wrap and then aluminum foil. Buttercream can be made two days ahead and stored in airtight containers in the refrigerator, but bring to room temperature and rewhip before using for the best piping consistency.
Troubleshooting Common Issues
If your cake layers are doming too much during baking, try reducing your oven temperature by 25 degrees and baking slightly longer. For the stacked assembly, if layers seem unstable, insert a few wooden dowels through the center of the cake for additional support, especially if transporting to another location. If buttercream becomes too soft while decorating, refrigerate for 10 minutes before continuing.
Serving Suggestions
This showstopper cake deserves center stage on your holiday dessert table. Serve slices on plates dusted with powdered sugar "snow" alongside coffee or hot chocolate with peppermint schnapps for adults. For a complete dessert buffet, pair with simpler options like shortbread cookies or chocolate truffles to balance the visual extravagance of the cake.
Flavor Variations
While the classic vanilla cake works beautifully, you can easily adapt this recipe by adding spices to the batter. Try cinnamon, nutmeg, and ginger for a gingerbread variation, or replace some of the vanilla extract with peppermint extract for a candy cane inspired version. For chocolate lovers, substitute 1/4 cup of the flour with unsweetened cocoa powder in one or more of the colored batters.
Storage Information
The completed cake will stay fresh at room temperature for up to two days if stored in a cake keeper or under a cake dome. For longer storage, refrigerate for up to five days, but allow slices to come to room temperature before serving for the best flavor and texture experience. Avoid storing near strong-smelling foods as the buttercream can absorb odors.
Kid-Friendly Adaptations
Turn this into a family decorating activity by baking the layers ahead of time, then setting up decorating stations with different colored buttercreams and assorted toppings. Let children pipe their own sections of the cake or add decorations where they choose. This creates not just a delicious dessert but a cherished holiday memory.
 Save
Save The true beauty of this Chaos Cake lies in its deliberate imperfection. Embrace the whimsical nature of the design and remember that any "mistakes" only add to its charm and character. This is the perfect recipe for bakers who want to create something spectacular without the pressure of achieving picture-perfect results.
Recipe FAQ
- → How do I achieve vibrant cake layers?
Use high-quality gel food coloring in divided batter portions, gently swirling for a marbled effect before baking.
- → Can I prepare the cake in advance?
Yes, bake layers a day ahead and keep them wrapped at room temperature or freeze for up to a month before assembling.
- → What substitutions work for gluten-free versions?
Swap all-purpose flour with your favorite gluten-free blend following package ratios for similar results.
- → What tips help with assembling the tree shape?
Level each layer, stack largest to smallest, and offset layers for a whimsical, crooked silhouette resembling a festive tree.
- → How can kids help with decorating?
Little hands can swirl colors, pipe buttercream, and place sprinkles or candies, making the decorating process interactive and fun.
- → How should I store leftovers?
Cover leftovers tightly and store at room temperature for up to two days or refrigerate for longer freshness.